Choosing Heavy Duty Storage Racks requires more than comparing prices and steel thickness. A suitable system must match the products, building, workflow, and safety expectations of the facility. Pallets filled with metal parts create different demands than cartons, drums, or long construction materials. Weight distribution matters too. A rack may support a stated load only when beams, frames, and connections are installed correctly.
Experienced warehouse planners begin with accurate measurements. Record ceiling height, aisle width, floor condition, forklift turning space, and emergency access. Then review each rack’s rated capacity, beam span, upright design, and adjustable levels. Supplier documentation should explain testing methods, installation requirements, and inspection guidance. Independent engineering advice can help when loads are unusual or the floor has limitations.
Small details often decide whether a rack performs well. Check for chipped coatings, bent uprights, loose anchors, and overloaded shelves during routine inspections. Protect corners near forklift routes with guards. Label every level clearly. Keep heavier goods low whenever practical.
The cheapest option may not be the most economical. Poor access can slow picking, while weak planning can create replacement costs. Still, capacity calculations are not the whole decision. Future growth, seasonal inventory, and changing package sizes deserve attention. A layout that works today might become restrictive next year. That possibility is easy to overlook.
Reliable selection combines field experience, verified specifications, and disciplined maintenance. When uncertainty remains, pause and ask for qualified advice. Safe storage is not simply about holding more goods. It is about supporting daily work with predictable performance.
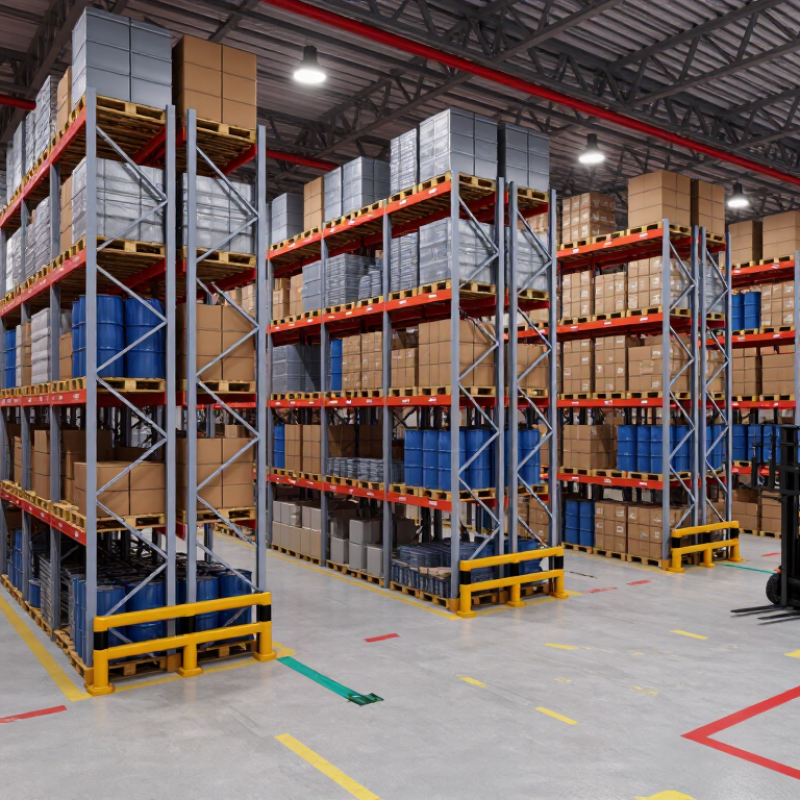
Heavy-duty rack capacity commonly ranges from 500 to 2,000 kg per beam level. This range is not a safe default for every warehouse. The correct rating depends on beam length, pallet weight, load shape, frame height, and floor conditions.
A 2,000 kg rating may apply only when two evenly distributed pallets share the level. One concentrated load can create dangerous stress. The Rack Manufacturers Institute’s ANSI MH16.1 specification requires rack design to consider load distribution, connections, stability, and seismic conditions. Capacity labels should match the tested configuration, not a sales estimate.
In practice, I record pallet weights, dimensions, forklift impacts, and clearance before selecting a rack. The U.S. Bureau of Labor Statistics reported 1,495 fatal injuries in transportation and material-moving occupations in 2023. That figure is not rack-specific, but it shows why handling design deserves attention. OSHA also identifies struck-by hazards and unstable storage as major warehouse concerns.
Avoid using the highest number on a quotation. A 1,500 kg level may be safer than a 2,000 kg level when pallets are uneven or beam spans are long. I have seen capacity decisions based on average loads, which can hide occasional heavier pallets. That approach needs review. Select a qualified structural assessment, install clear load plaques, and inspect damaged beams immediately.
Choosing heavy duty storage racks starts with the pallet, not the rack frame. Measure pallet length, width, height, and actual loaded weight. Add clearance between pallets, beams, and uprights. A rack that fits an empty pallet may fail with wrapped cartons or uneven loads. Beam length should support the pallet safely without excessive overhang. Confirm each beam level’s rated capacity with a qualified supplier or structural engineer.
A 3–3.5 m aisle can improve storage density, but it must match the handling equipment. Reach trucks may work within this range, while counterbalance forklifts often need more turning space. Check the manufacturer’s operating specifications, turning radius, mast height, and load center. Mark the aisle on the floor and test a fully loaded vehicle before installation. This simple trial often exposes problems that drawings miss. I have seen plans look efficient, yet leave too little room near end frames.
Tips: Keep heavier pallets on lower levels. Leave visible clearance above each load. Inspect anchors, beams, and safety pins regularly. Do not guess capacity. Record pallet weights, aisle measurements, and vehicle requirements before ordering. A small measurement error can create a costly redesign. Expect some adjustment. Warehouses rarely behave exactly like the original plan.
How to Choose Heavy Duty Storage Racks?
Warehouse growth is increasing pressure on every square metre. Grand View Research estimates the global warehouse racking market reached about USD 9.6 billion in 2023, with strong growth expected through 2030. That growth does not make every rack suitable. Selective pallet racking offers direct access to each load and supports varied stock keeping units. It usually fits warehouses needing frequent picking and simple stock rotation. Drive-in racking stores more pallets in less aisle space, but it limits access and works best with uniform products and predictable batches. It can punish poor loading habits.
Cantilever racking suits long, irregular loads such as pipes, timber, and metal profiles. Upright spacing and arm capacity must match real load dimensions, not estimated averages. Multi-tier systems create several picking levels without expanding the building footprint. They can improve storage density, yet stairs, guardrails, lighting, and evacuation routes require careful planning. A dense layout is not automatically efficient.
Safety comes before capacity. OSHA reports that forklift incidents cause about 85 fatalities and 34,900 serious injuries annually in the United States. Rack damage, unstable pallets, and unclear load ratings deserve immediate attention. RMI’s ANSI MH16.1 standard provides design guidance for steel pallet racks, but site conditions still matter. Measure aisle widths, pallet weights, turnover rates, and ceiling height before choosing. A spreadsheet may look precise. It can still be wrong. Recheck the design after real picking data arrives.
How to Choose Heavy Duty Storage Racks?
Heavy-duty racks should be selected from engineering evidence, not appearance or steel thickness alone. Request the steel grade, yield strength, heat number, and mill test report. Then compare them with the supplier’s design calculations. A thicker-looking upright can still perform poorly if its steel grade or connection design is unsuitable. I have seen specifications list only “high-strength steel.” That wording is too vague.
Beam deflection deserves equal attention. ANSI MH16.1-2023 generally limits loaded beam deflection to span divided by 180. A 2,700-millimeter beam, therefore, should not deflect beyond approximately 15 millimeters under its specified design load. Measure the actual span, pallet weight, load distribution, and connector condition. Uneven pallets can create concentrated forces that calculations may not fully represent. Small details matter.
Compliance also requires more than printing “ANSI compliant” on a quotation. Ask for the applicable ANSI MH16.1 design basis, load tables, seismic assumptions, and inspection guidance. OSHA’s 2023 Census of Fatal Occupational Injuries recorded 885 fatal falls, slips, and trips across U.S. workplaces, although the figure does not isolate rack incidents. That limitation matters. Keep impact records, inspect damaged frames, and replace questionable components instead of straightening them casually. A qualified structural engineer should review unusual layouts, high seismic zones, and altered rack systems.
Verify steel grade, beam deflection, and ANSI MH16.1 design requirements before selecting a rack system.
The bars show nominal minimum yield strength for commonly specified structural steels: ASTM A36: 36 ksi, ASTM A572 Grade 50: 50 ksi, and ASTM A992: 50 ksi. The line shows the preliminary beam-deflection limit of L/180 commonly applied in ANSI MH16.1-based rack design practice. For a 96-inch beam span, L/180 equals 0.533 inches. Final selection must verify the applicable ANSI MH16.1 edition, rack geometry, load combinations, connection design, seismic requirements, and the engineer’s specified serviceability limits.
Calculate Storage Density, Forklift Access, and Total Cost of Ownership
Storage density begins with accurate measurements, not a catalog image. Record floor area, ceiling height, pallet dimensions, and maximum load weight. Then compare usable cubic volume with the building’s total storage volume. A rack layout may hold more pallets, yet waste space above short loads.
Leave enough aisle width for the forklift’s turning radius and load length. Measure the machine, not just its specification sheet. Include clearance for mast movement, damaged pallets, and occasional awkward loads. During warehouse projects, I have seen narrow aisles reduce handling speed and increase rack contact. More positions did not always mean better performance.
Calculate total cost of ownership over several years. Include rack purchase, installation, floor preparation, inspections, repairs, relocation, and forklift travel time. Energy and labor costs can exceed the original rack price. Use a simple estimate: annual operating cost multiplied by service years, plus the initial investment. My first estimate was too optimistic because it ignored congestion during peak shifts. That mistake changed the layout.
Check beam capacity, upright protection, anchoring requirements, and visible load notices with a qualified professional. Do not rely on appearance alone. Steel can look strong while an overloaded connection quietly weakens. Leave room for inspection. Small gaps matter.
Capacity commonly ranges from 500 to 2,000 kilograms per beam level. The rating depends on beam length, pallet weight, load shape, and frame height. It is not a universal safe default.
No. That rating may assume two evenly distributed pallets. One concentrated pallet can create dangerous stress. Capacity labels should match the tested configuration, not an estimate.
Record pallet length, width, height, and actual loaded weight. Measure beam spans, floor conditions, ceiling height, and clearance. Include wrapped cartons and uneven loads. Measure real loads.
Aisles around 3 to 3.5 meters may improve storage density. However, the required width depends on the handling vehicle. Check turning radius, mast height, load center, and load length. Test a fully loaded vehicle before installation.
Place heavier pallets on lower levels when practical. Keep visible clearance above every load. Avoid excessive overhang beyond the beams. Small gaps matter.
Record floor area, ceiling height, pallet dimensions, and maximum load weight. Compare usable rack volume with the building’s total storage volume. Do not rely on a catalog image. Plans can mislead.
Include purchase, installation, floor preparation, inspections, repairs, relocation, and vehicle travel time. Labor and energy may exceed the original rack price. Estimate yearly operating costs across the expected service period. My first estimate was too optimistic.
Inspect anchors, beams, safety pins, upright protection, and visible load notices. Check for impact damage after vehicle contact. Stop using visibly damaged components until a qualified professional assesses them. Inspect regularly.
Choosing Heavy Duty Storage Racks requires more than selecting the strongest-looking equipment. Begin by defining the required capacity, typically ranging from 500 to 2,000 kg per beam level, and match rack dimensions to pallet sizes, load weights, ceiling height, and aisle requirements of approximately 3–3.5 meters. This ensures safe handling and efficient use of available space.
Next, compare rack systems according to operational needs. Selective racks provide direct access to every pallet, while drive-in systems maximize storage density. Cantilever racks suit long or irregular materials, and multi-tier systems make better use of vertical space for manual picking. Before installation, verify the steel grade, beam deflection limits, load signage, and compliance with ANSI MH16.1. Finally, evaluate storage density, forklift access, installation expenses, maintenance, adaptability, and long-term operating costs to choose a safe, practical, and cost-effective solution.
